


Library DIY
Chic Bookshelves...FINALLY!


Due to length, you may need to click through to read this in full!
Confession: I have lived in my San Francisco apartment for 21 years. I know, she’s been drinking underage this entire time… Despite the fact that (lately) I am consumed by an endless desire to move to something a bit larger, a bit easier, a bit more equipped with the modern conveniences, the golden handcuffs of rent control continue to make me their bitch.
I resigned myself to the fact that I wouldn’t be moving out any time soon around 2013 when I was making pretty good money (finally) and also got a nice bonus for the first time in my career. I thought: Hmmm. Maybe I could actually make this place somewhere I want to live in a bit longer? Thus began a 3-year long project (okay, longer) to do just that: renovate. Obviously we’re not talking about construction projects here, but a few pieces of new furniture, some painting projects, and wallpapering soon defined my life. I took it on project-by-project, and finally got it where I wanted it to be.
To be clear: as a person on a budget, I knew I couldn’t do everything at once…and that’s entirely okay. I think the expectation is that we decide we’re going to make changes and get impatient when things don’t come together lightning-fast. If you have limited funds you need to shop carefully, know you really really love the thing you’re bringing into your space, and realize you’re going to be doing the work yourself. I wanted to hire someone for the first wall of wallpaper I wanted to do, but the quote came in at $800 for one wall! I immediately went to YouTube and learned everything about it and quickly determined that I could do it myself. Now, this isn’t for everyone. I have an art degree and a design degree and my own power tools and a deep wellspring of figure-it-outedness within me. I also knew I wasn’t paying $800 for someone else to do it. Scarcity begets ability. Was it scary? Yes. Was it an absolute gut-check to cut into a role of wallpaper I’d used the better-part of a paycheck to buy? A thousand percent. But, I knew how satisfied I’d be once I got through it, and the rush was amazing.


That DIY mastery is a helluva drug, I tell you. Every project that had my friends gushing made me mad with creative power, wanting to do more, more, MORE. So, I did everything…except one very particular space: my hallway library.
In my self-made cozy-but-elegant little world I’d made, this area was a gaping wound. This hallway is only about 5 feet long and takes you from my living/main area to my bedroom. The bathroom is on the right side, and the left side is about 10-inches deep…making it perfect for some hanging shelves. What was I thinking? This is a 100-year old building made of wood with lathe-and-plaster walls; if you don’t have original built-ins, the walls definitely won’t support them. That’s kind of just how it goes. So, I compromised…with Ikea.
Everyone loves an Ikea Billy bookcase, myself included. But. But. Okay, I might as well present you with THE PROBLEM. This is a hand-drawn schematic of the hallway space and you’ll see why/how a Billy was really only ever a make-shift solution.
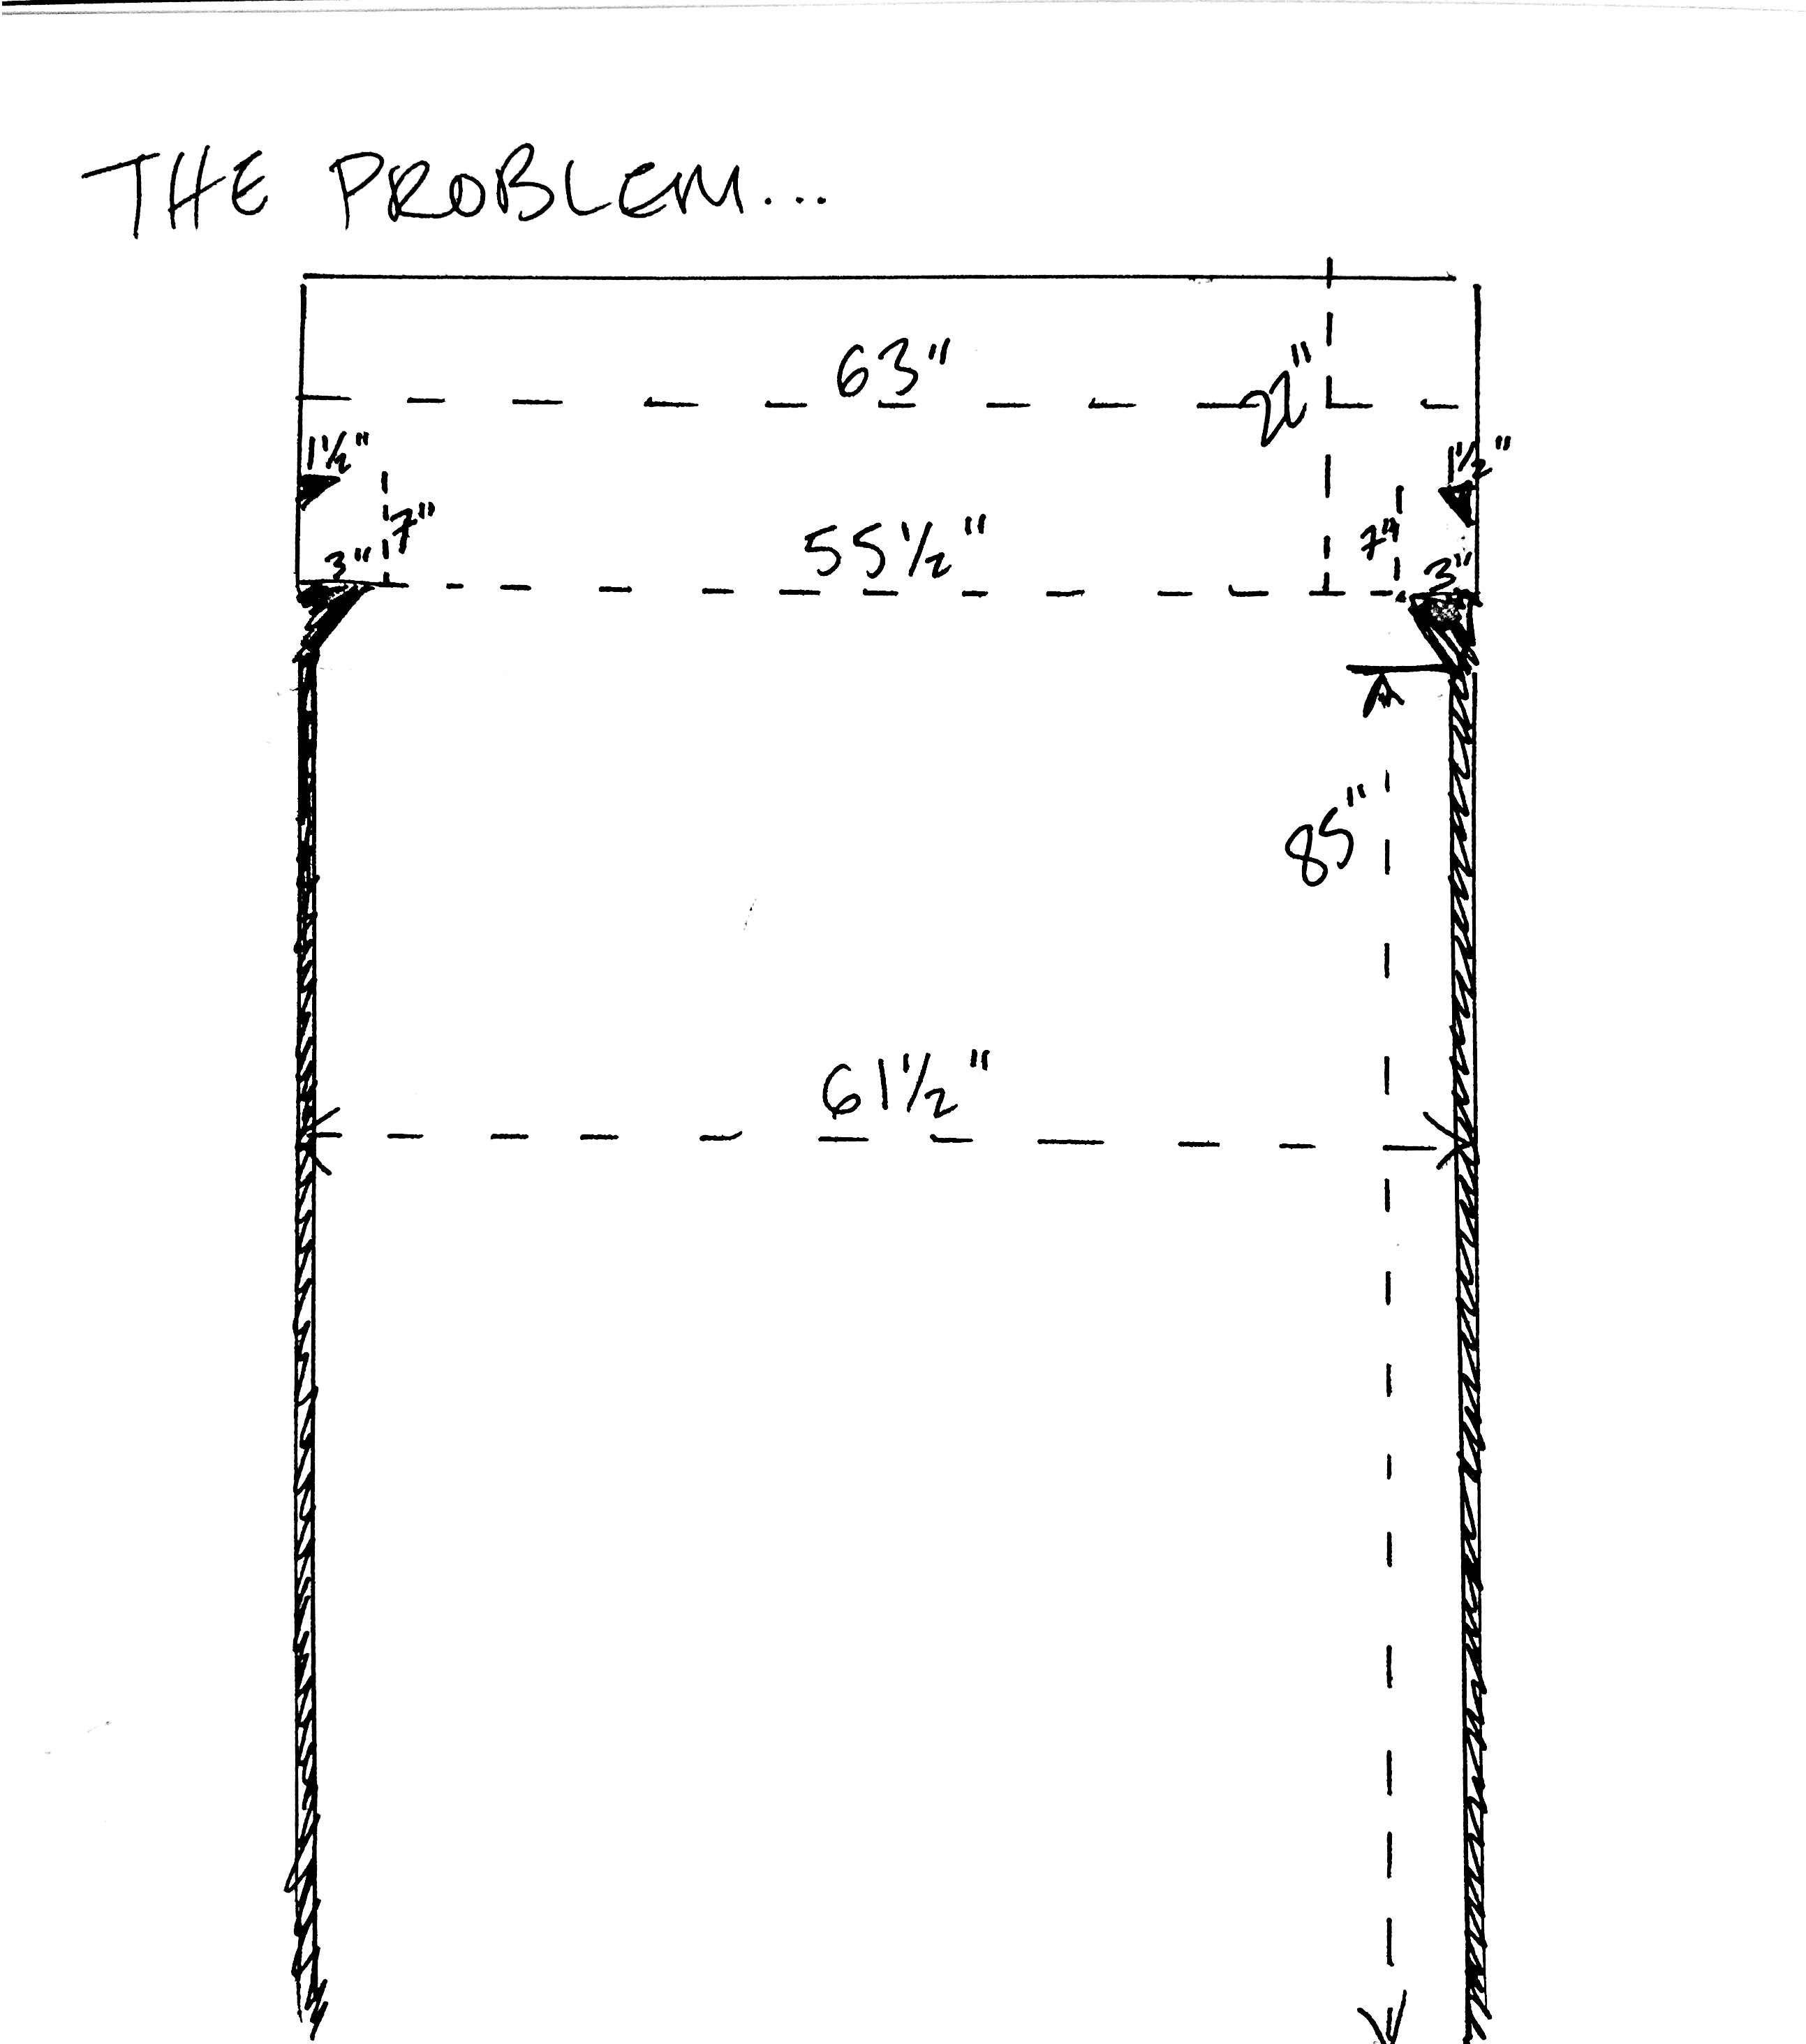
That’s right, the space looks deceptively generous and then there’s all kinds of subtle little obstacles by way of those pesky Edwardian-era crown moldings. There’s also a curvaceous little baseboard to the tune of 8” high from the floor (not shown). And let’s consider the math: a wide Billy bookcase measures 31 1/2” inches, and my space is just 61 1/2” wide, ergo a pair of the same wide Billy bookcase will not work, being just 1 1/2” too wide, landing at 63”. Screaming at the Norse Gods. A standard Billy measures 15 3/4” wide, so I could do 3 of those, but not 4 (which would also be 63”). Stymied by any attempt to create something streamlined and affordable for the space, I had to cobble together a mix of one wide Billy, one standard Billy, and one 8” wide small bookcase that I think was intended to hold CDs. I did get the upper extensions though, so the shelves went up to 93 1/4”, which was pretty good, except the little tower wouldn’t go that high. The Billy has a flat back too, so it ultimately sat an inch or so off of the wall, and fitting it into the crown molding made the whole trio look like a poorly-fitted suit: a little wobbly, uneven, messy, and gaps everywhere.


During the pandemic, a terrible person moved in next door to me, sharing the wall that this bookcase is against on my side. Their stereo lived against the wall on their side and they loved to boost the bass. Pretty soon I wondered why I was finding all of those little metal shelving pegs on the floor, and pondering why my shelves were falling down on themselves. Terrible person eventually moved out and I spent a few days “re-organizing” the shelves, putting the pegs at new levels and trying to make it work, but I knew in my heart it was time for me and my Billys to call it a day. I held on for another 2 years though, until finally…finally.
Okay, back to THE PROBLEM above.
Or maybe let’s consider the solution I wanted:
open bookcase that would allow a fun pop of color or wallpaper behind
one that would maximize space efficiently
one that would attach to the wall securely
one that would give the look of a built-in
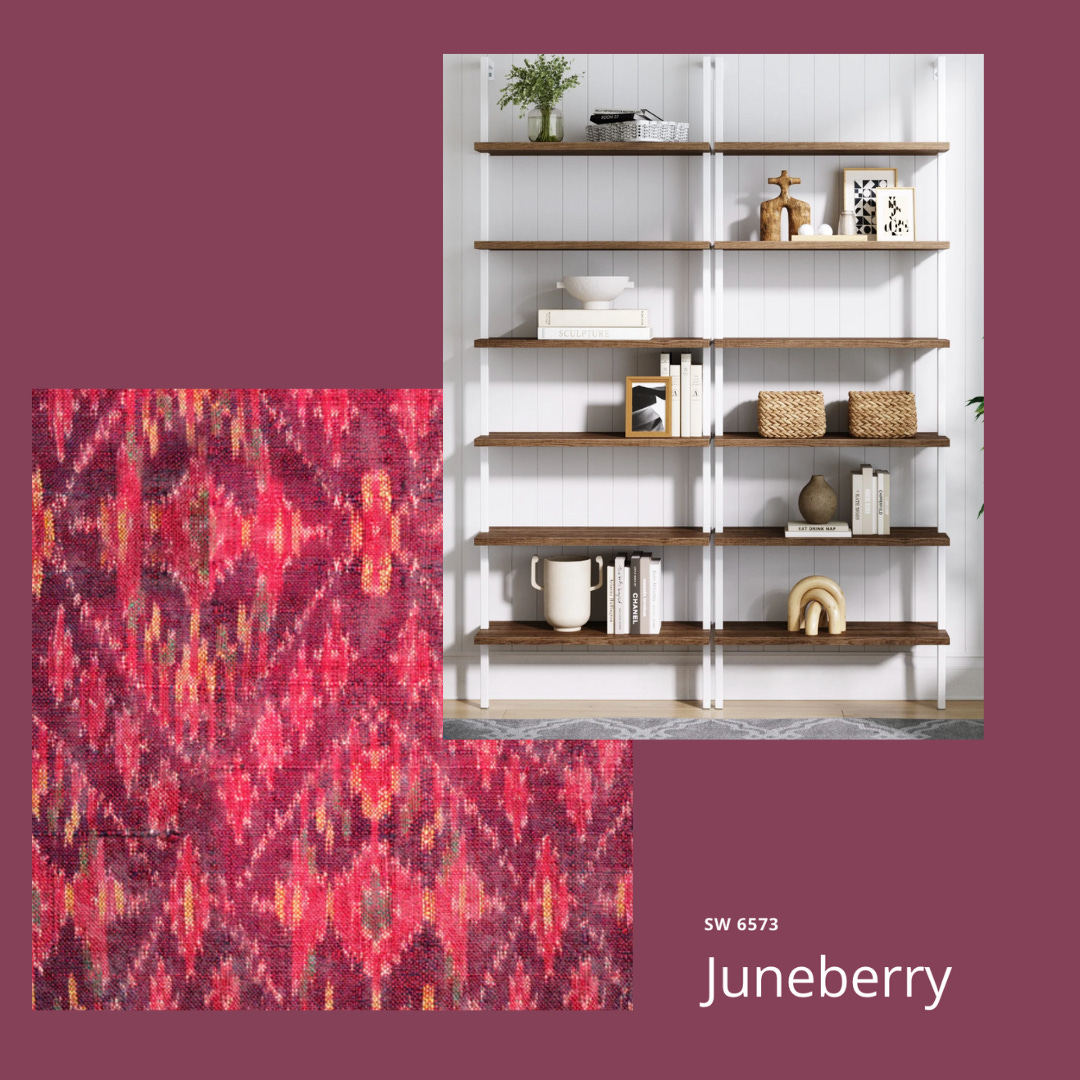
Since the space is so small I wanted it to feel sort of jewel-boxy. I wanted a warm, darker color in the range of a deep pink or magenta (an accent color in my bedroom with the “Judarn” mural,) and some kind of a bold but sophisticated wallpaper pattern behind it all. I’d had the “Bukhara” wallpaper filed away for my future, bigger, apartment so decided to go with that. One roll would be enough, which is good because at $239 it felt pricey, but I also knew I loved it and didn’t want to cheap out. (Listen: as with clothing and shoes, very rare is the cheap wallpaper that looks as expensive as you want it to look. The colors, scale, resolution…something is always just off.) It also made me feel good to buy it from 2Modern, which is a company local to the Bay Area.
To make the wishlist above, I needed to re-approach THE PROBLEM.
61 1/2” wide? Okay. We can do one 60” unit, or two 30” units max.
Said units would need to be 85” high because of the first crown molding that sticks out 3”. I could decrease the width to 55 1/2” to accommodate the crown molding, but leave all those precious side inches on the table? No.
I’d always really liked the CB2 Stairway Bookshelves, and they’re 30” wide, and go up to 90”. Sounds great. But at $449 each? Wow, that’s nearing $1000 just for the bookcases with tax and shipping. Hmm. Maybe there’s a dupe? Enter the Nathan James Ladder Bookshelf, which offers the PAIR of bookcases for just over $300. Even more miraculous is that each unit measures 30” wide and the side brackets extend up to exactly 85”. So, in a perfect world they would sit right under the crown molding…this is too good to be true!
But what about that extra space above? Even if the side brackets rested at 85” high, the top shelf of the fixture would rest 11 1/2” inches below. And there’s another 22” of wall space above the crown molding. Could I somehow get two extra shelves and add them in?
So that’s what I did. I ordered the Nathan James bookshelves in the oak/white color combo, picked up a pair of white oak shelving planks at Lowe’s and nabbed some stain to try to get them to somewhat match the oak shelves. I got some plain white metal shelf brackets on Amazon to support them.


So, I’d never actually stained shelves before…and I wouldn’t recommend. I was paranoid and unsure of myself the entire time. Wood stain is highly toxic, so you have to use a full respirator, even outside. It’s also highly flammable; I did my staining on the roof of my apartment building and I was convinced I was going to burn the place to the ground the entire time. Staining is messy and gloopy and uneven, and it takes HOURS for it to dry enough to even apply a second coat, let alone a sealant coat. And did I mention that you’re sanding constantly? Yeah. I also maaaayyybe had the shelves cut slightly too long so had to do a little last-minute trim-trim so they could be wedged into place. Once done though, I felt pretty good about them.
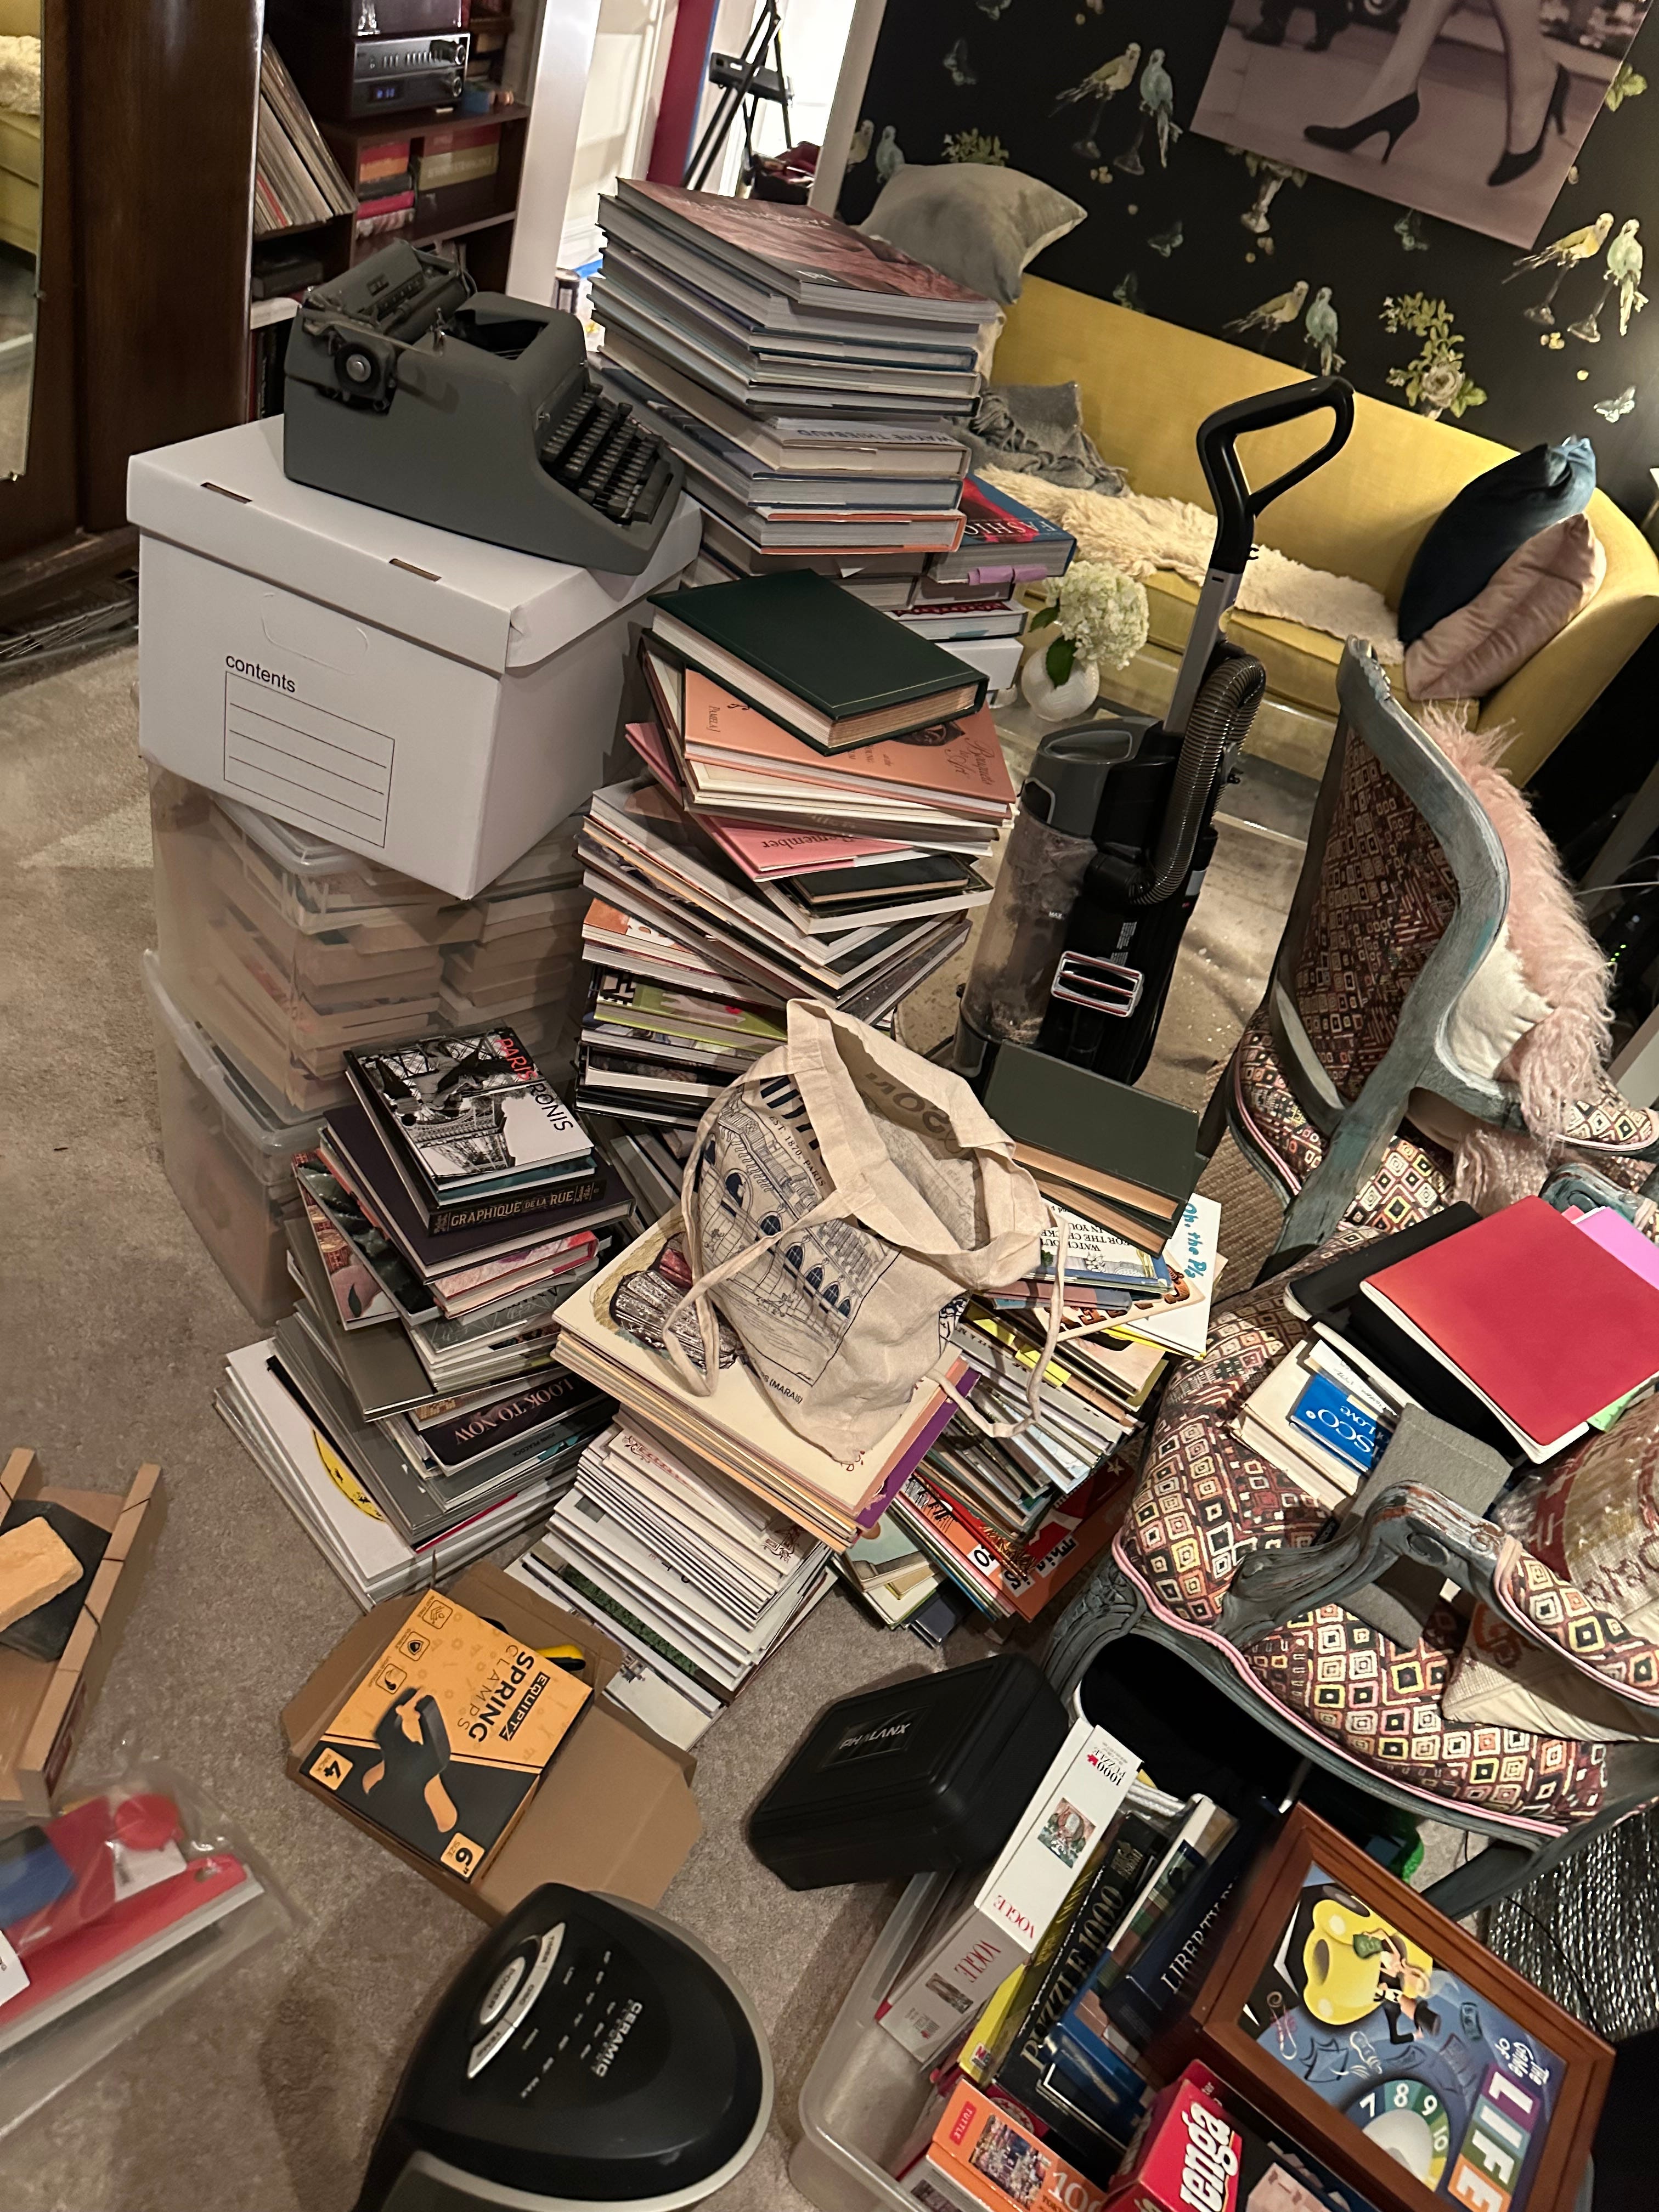
Step one: Move all books. This is no easy feat. I love my books: art books, monographs, fashion books, literature, reference…I have cultivated this collection for years and it’s one of my true loves. I had piles of books everywhere for about a week while I worked on this…because it was definitely not a one-day project.
Step two: Disassemble Billy bookcases and dispose. Bye bye bye Billy bye bye.
Step three: CLEAN. Yes. The wall behind the bookcase had dust all over it, so started with a Swiffer duster over everything: walls, base boards, molding, ceiling. This was followed by a nice washy-wash with TSP. Tri-sodium phosphate is really incredible stuff and it’s the only way to get your walls clean enough to repaint/prime/wallpaper, especially when its been a few years.
Step four: MASK all of the trim. I know it’s a bitch but it has to be done.
Step five: Patch holes with spackling. I was painting the whole hallway and getting the opposite wall ready for a new set of family photos, so yeah.


Step six: Paint. Since I was doing just 3 short walls and a ceiling, I only bought one quart of Sherwin Williams’ “Juneberry”, but I used every last drop of it. I also used a paint formula that was paint-and-primer in one, to make things easy. But, as with any dark color going over a beige wall, it took almost three coats to get every little bit covered.
Step seven: Wallpaper. The “Bukhara” paper was a “paste the wall” method of wallpapering, which I’d never done before and I’m not sure I like as well as the old-fashioned “paste the paper, book it, get it on the wall” method. I used the paste generously, but felt like I had to go back and do the edges more than once which isn’t always reassuring. In the end though, it got done.


Step eight: Install bookshelves. I’d already assembled the shelves before and gave them a “test fit” before starting to wallpaper, but I still wasn’t going to be sure-sure until I could bolt them to the wall. I held them in place and marked the bracket holes so I could drill and install the anchors. I also knew it would be a little close for the upper brackets too, so wanted to drill their placement while there was still some room to work.
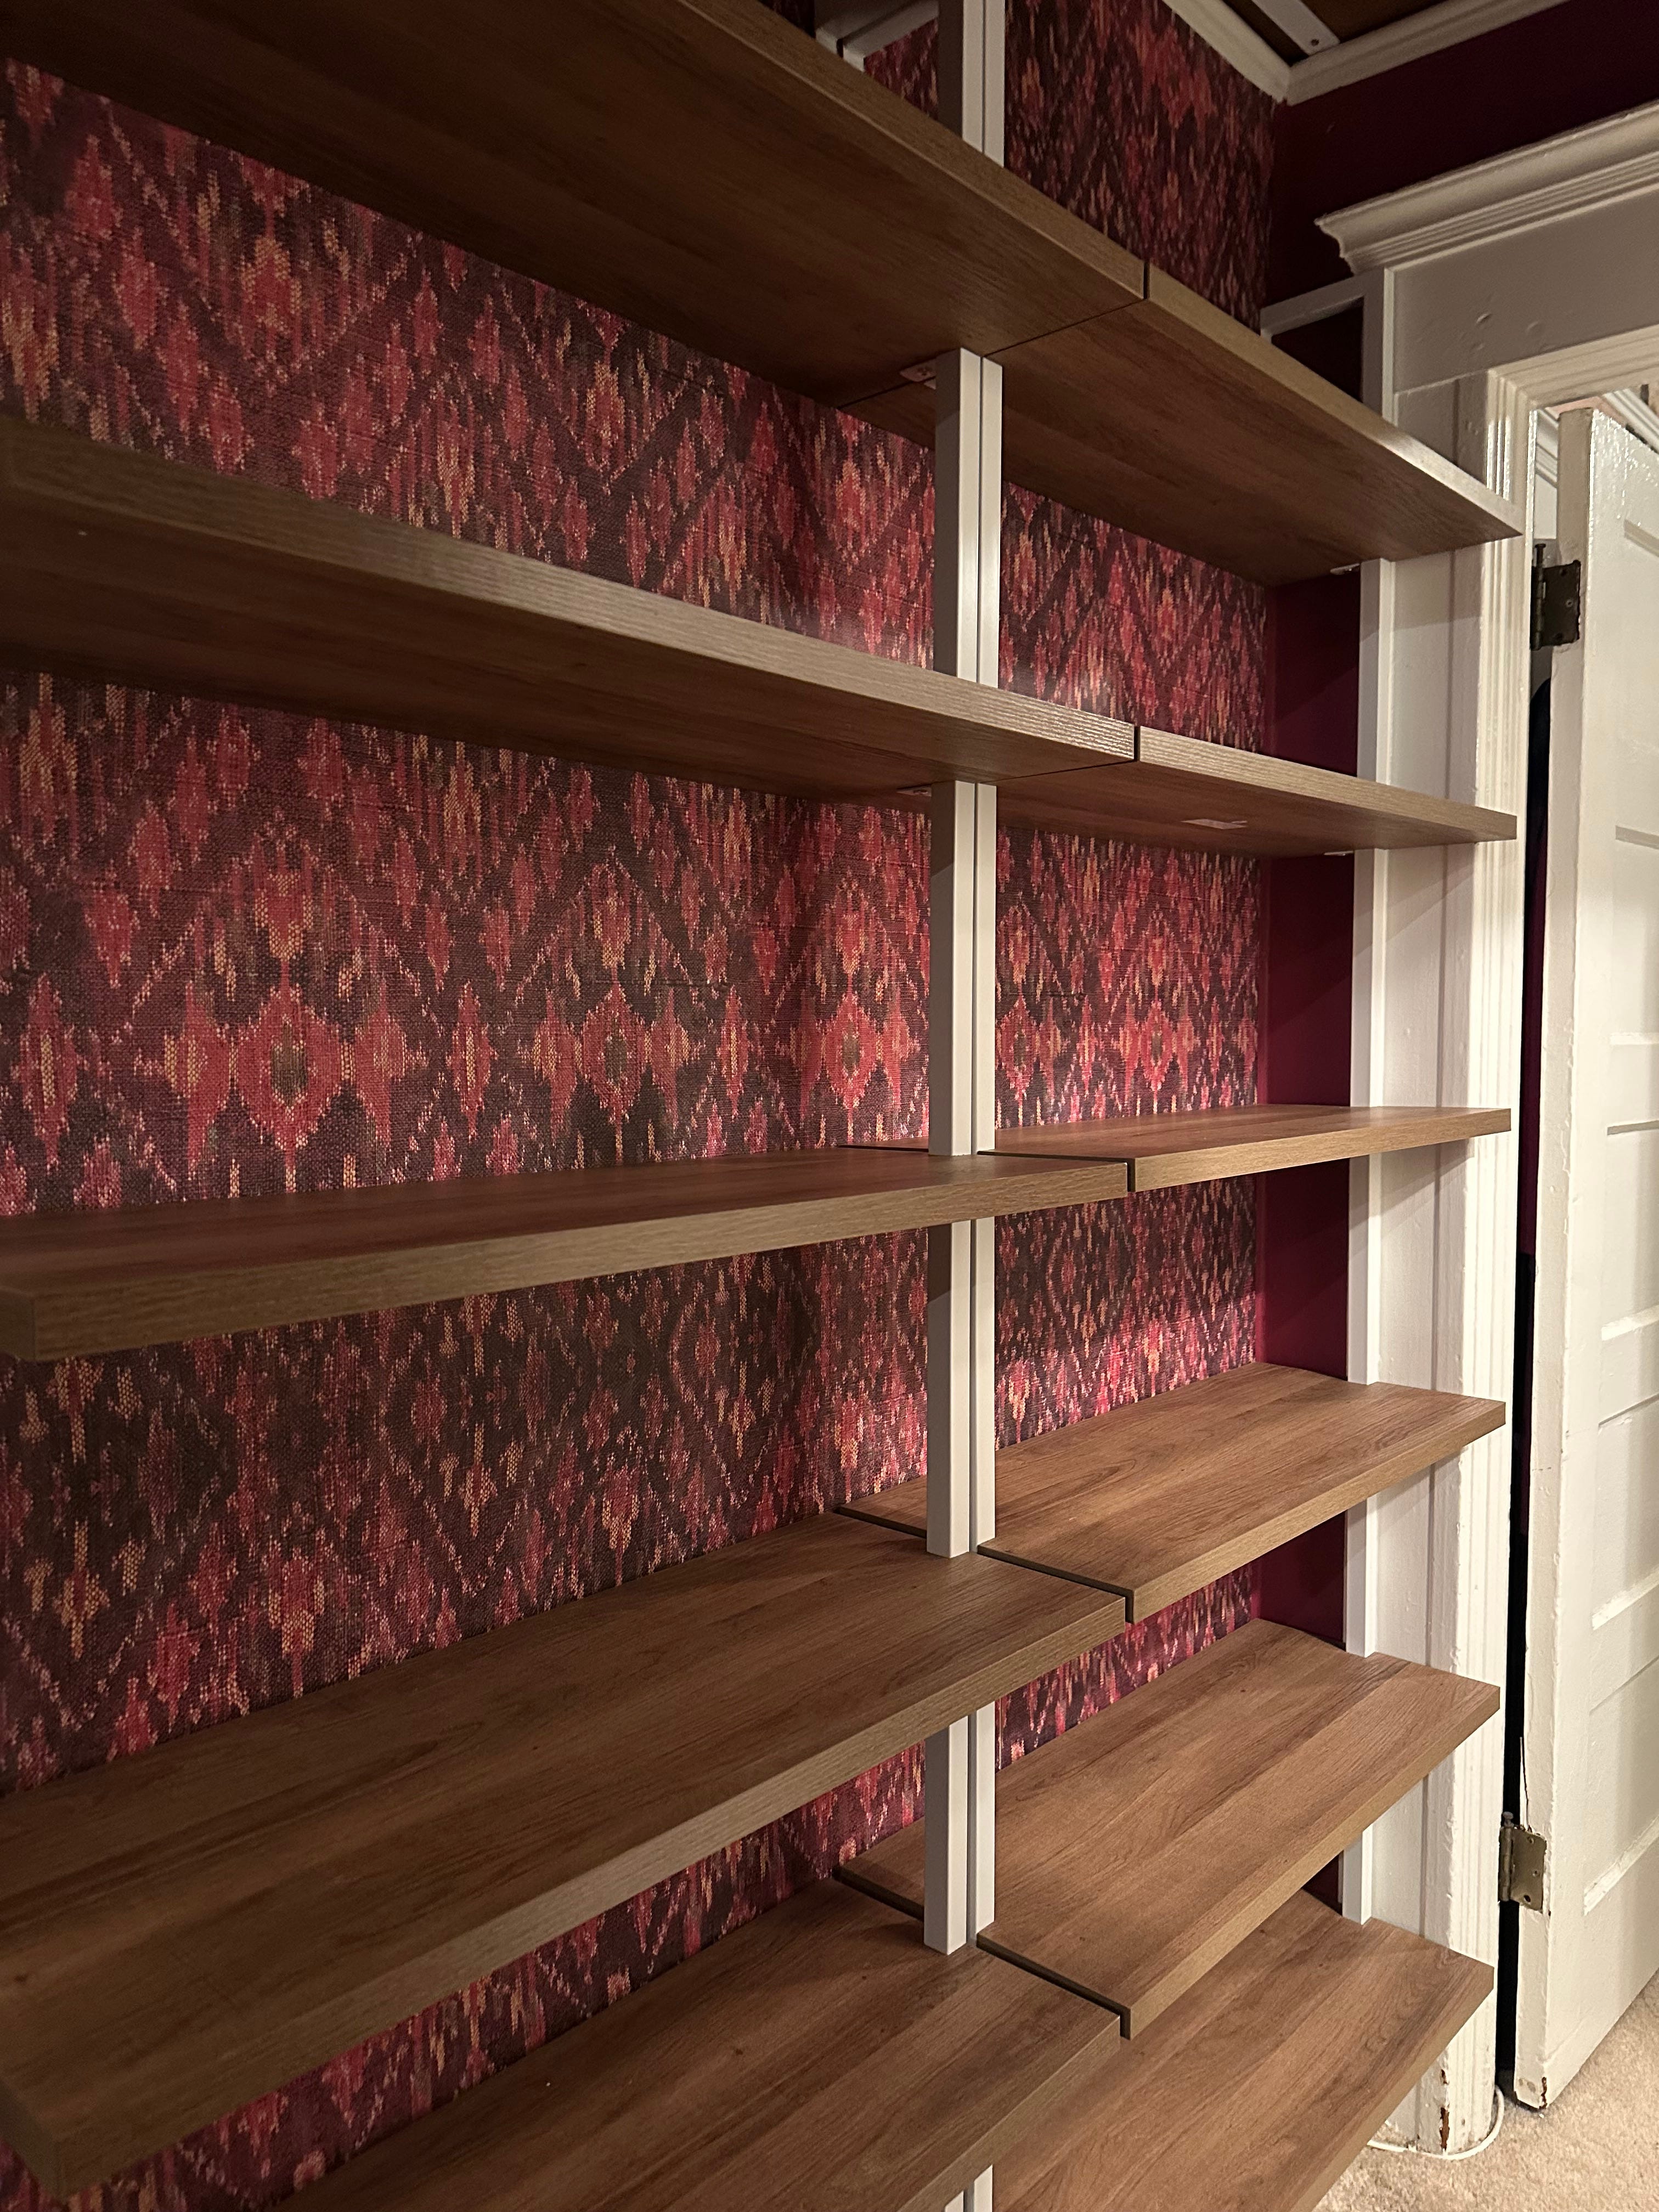
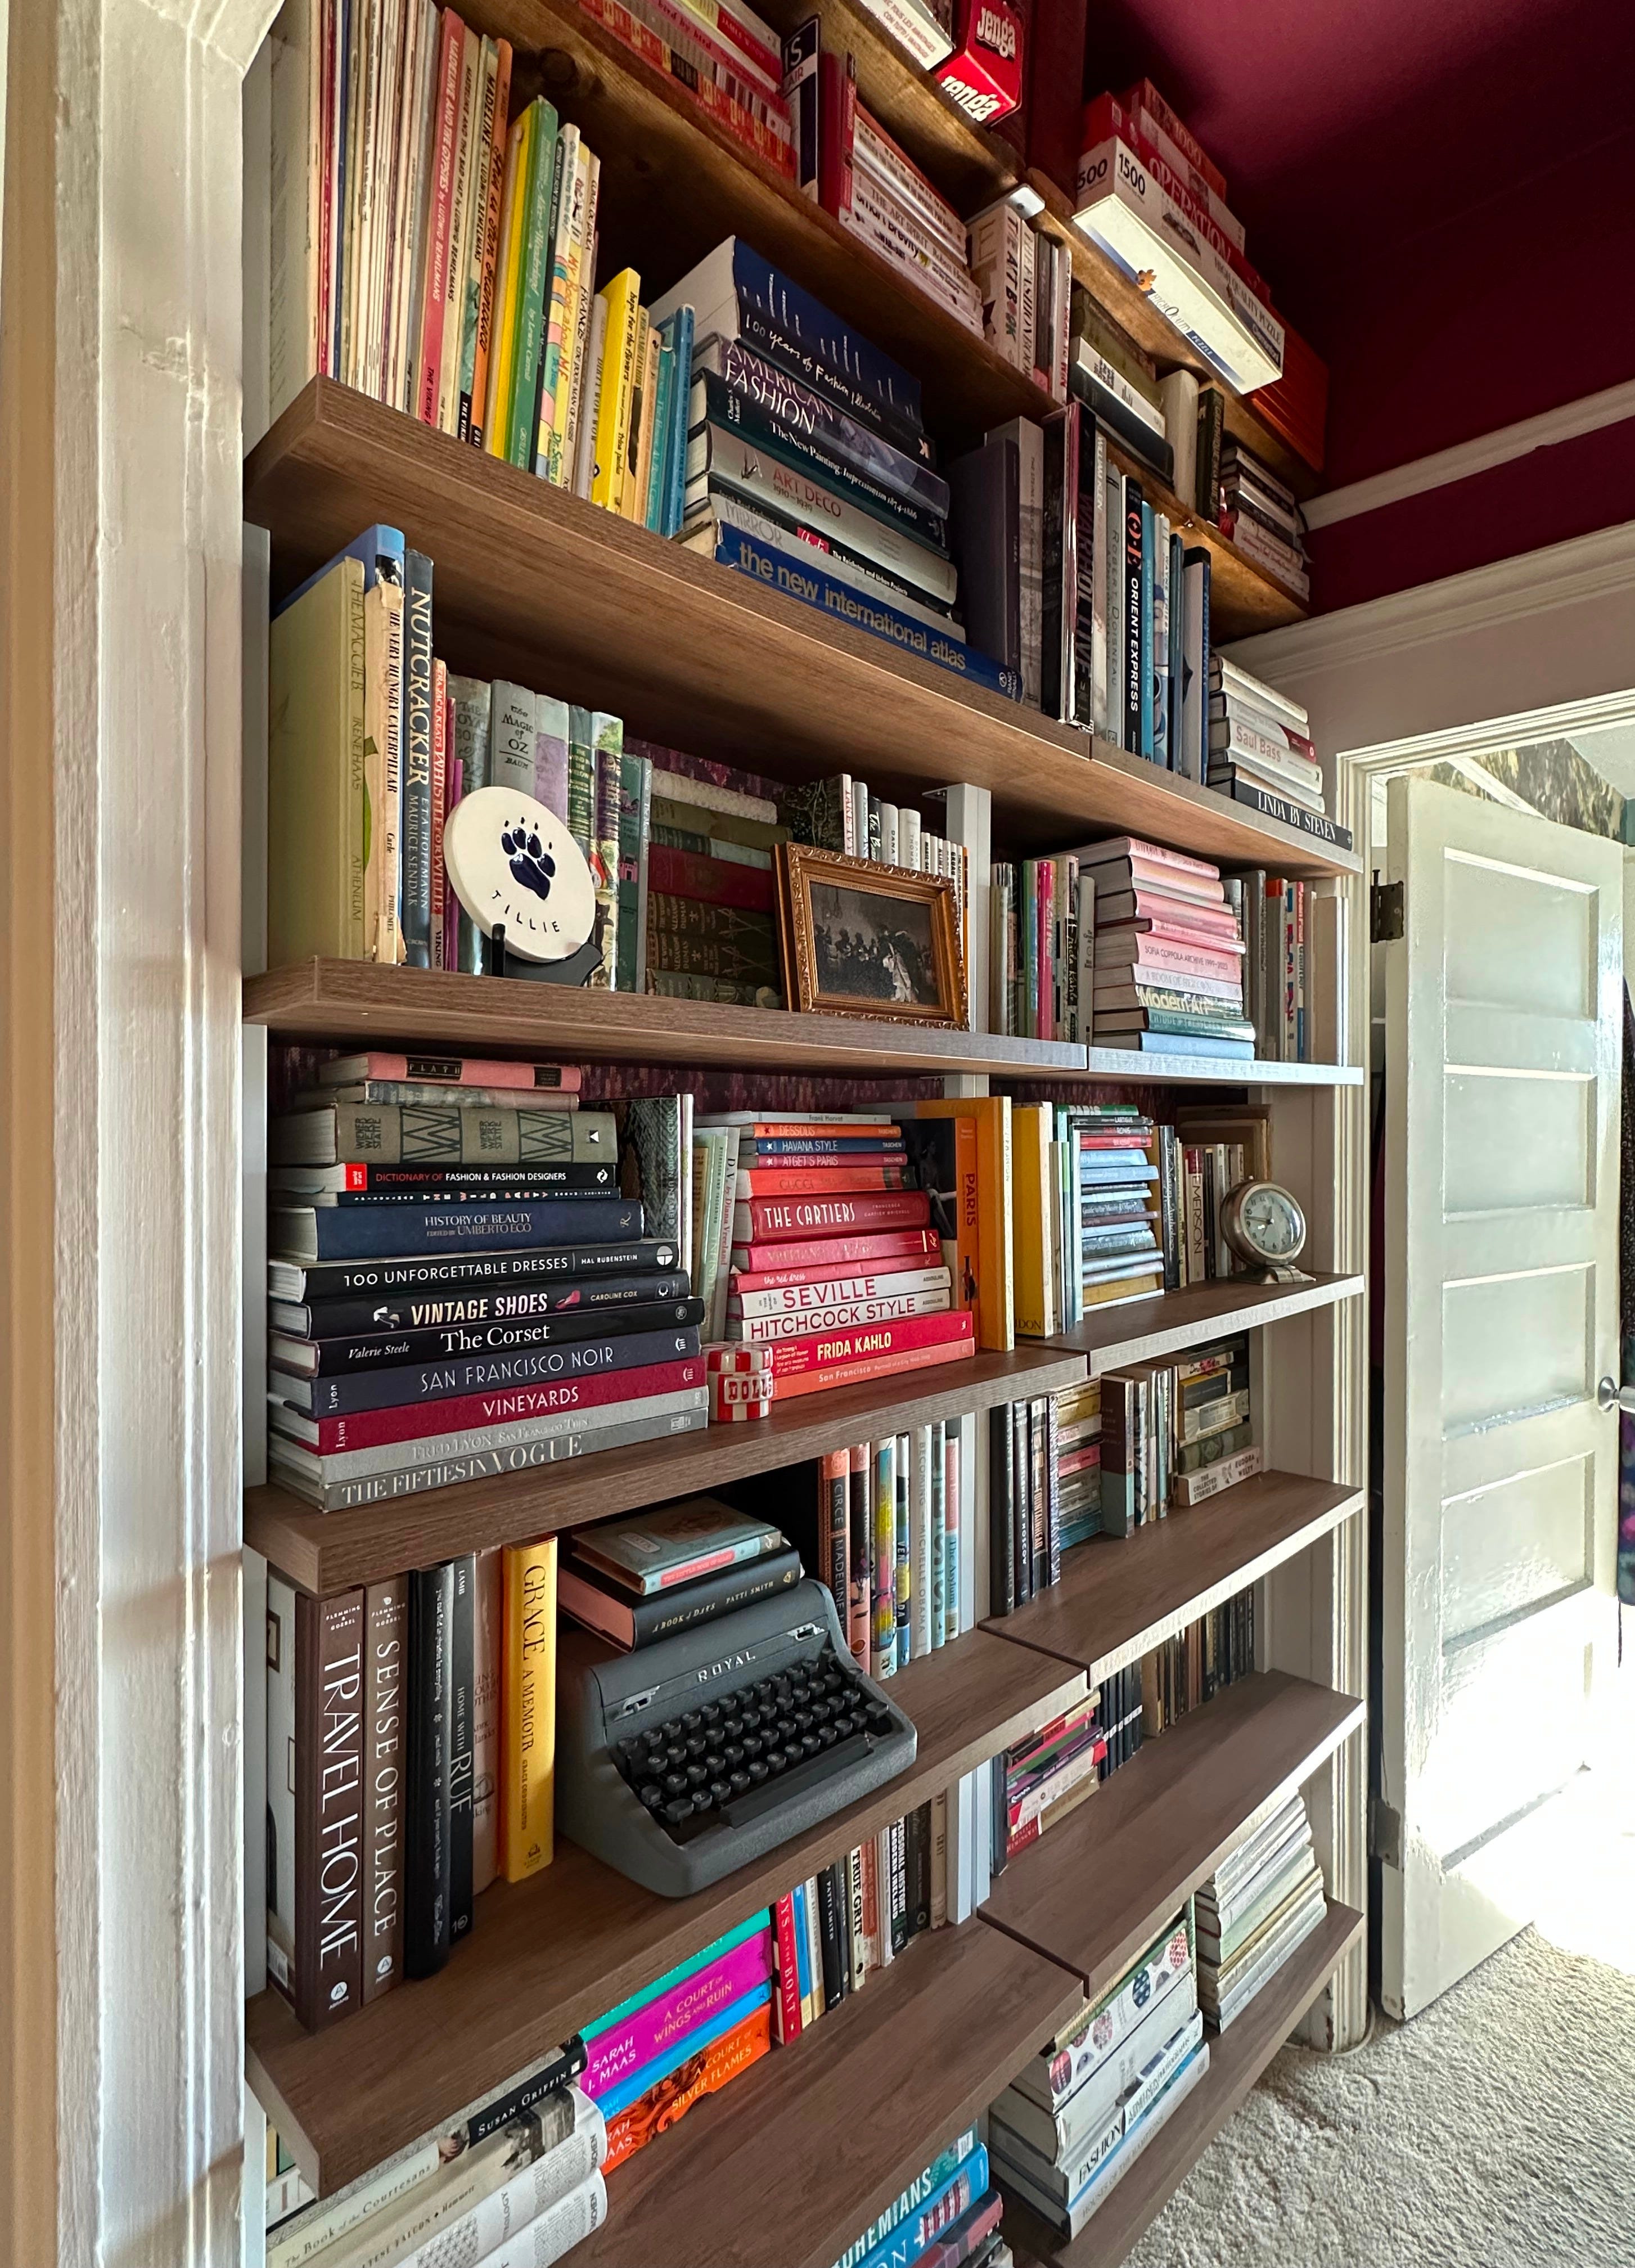
I really like how the two upper shelves look like a very close match to the oak tone on the shelves below. At a glance it definitely looks like a built-in. Now, I did have to get rid of two big boxes of books to make everything fit, but that’s okay too — a good clean-out is good for the soul, and I was able to donate them to the Friends of the SF Library, which is an excellent organization.


Yes, the wallpaper is essentially covered up by the books, but I definitely do see it and it gives the whole thing a really nice dimension. I’m not one for “styling a bookcase” although I do like things to have a sense of order. I alternated stacks vertically and horizontally so I could fit more, and I think this makes it look a bit more considered. I think bookshelves should be for books, so popping a vase or a plant up there wouldn’t be my thing: why would I give up such valuable real estate when books could be there? I have since added a few more knick-knacks and objects though, and done a bit more re-arranging/refining.


There’s just one other thing that I’m not sure how to solve…lighting. I’ve added a few strands of little LED “fairy” lights, but once the natural daylight is gone, this little hallway is very dark. (Yes, that’s why there’s some flameless candles on the shelves there.) At night, if anyone who wants to browse they have to throw on the bathroom light, which isn’t exactly romantic.
So, trying to sort out some kind of light that is petite (shelves are only 11 1/2” high, except for the top shelf which is only 14” high), with a compact footprint, and hopefully something with a switch/plug-in. I have no desire to be changing batteries or charging something via USB. I’ve considered a sconce above the doorway, but thinking a little table lamp would be great. Of course, my favorite lamp is the Eloise Table Lamp from Anthropologie, which nets out to being about one inch too tall to fit. Ugh.
Here’s a set of somewhat-boring basics that will probably get the job done, but also look a little bit cheap…yet cheerful.
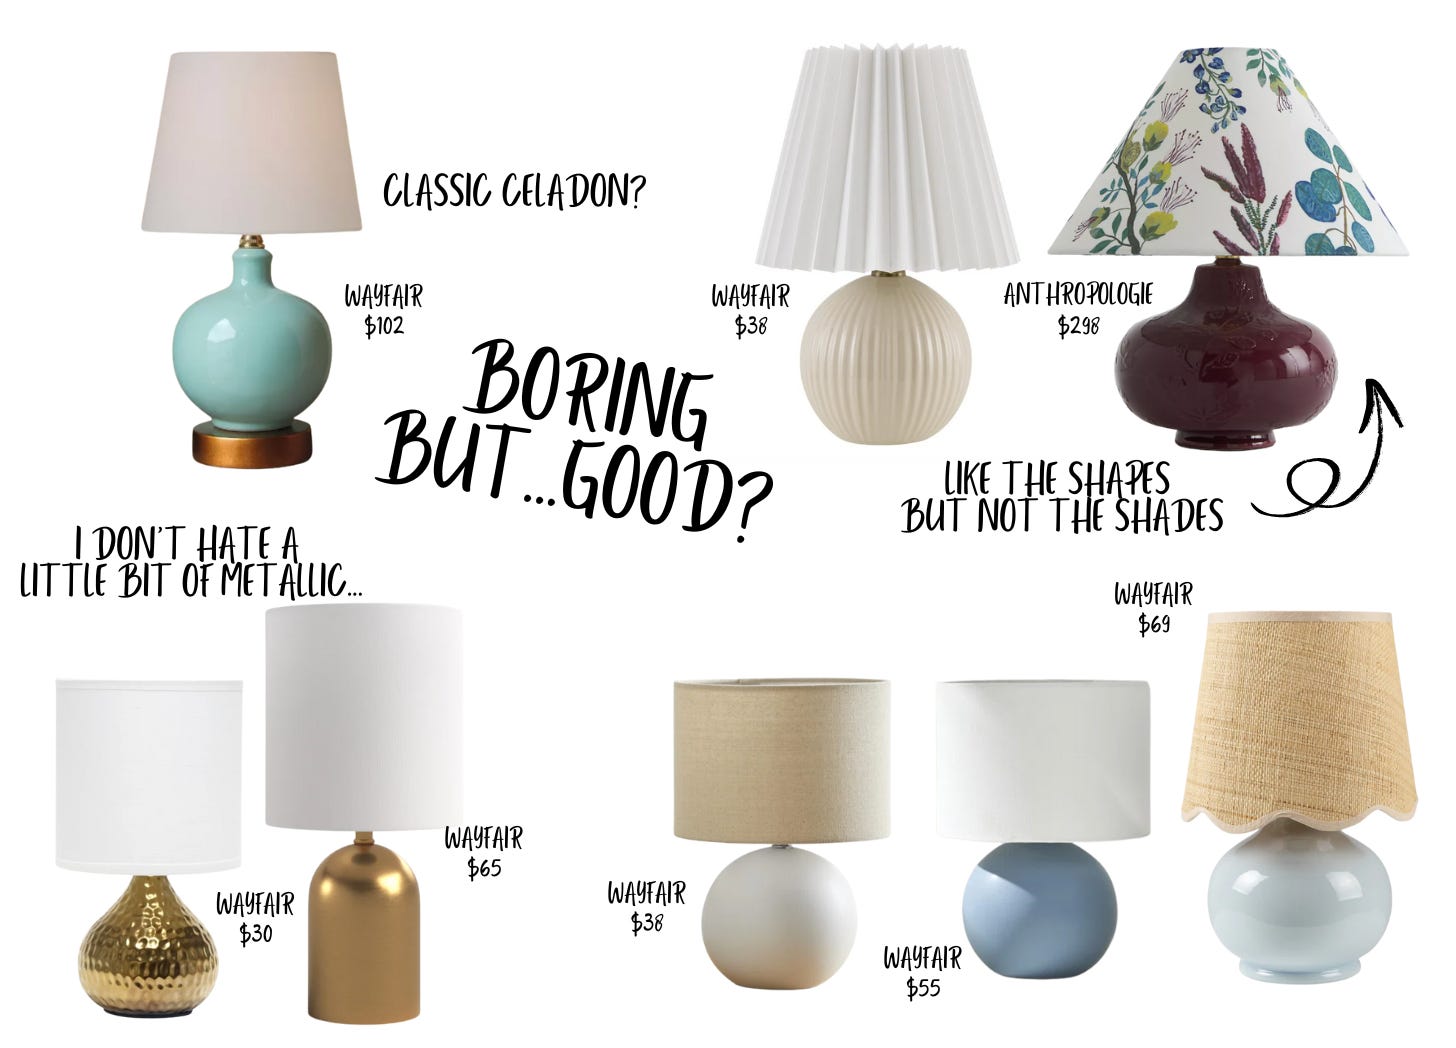
I kind of like a light shade of blue or denim blue in the mix to break up the magenta…or some kind of metallic. These little round lamps are cute, but unsure how much light they’d actually project. I’m thinking that it may be fun to have the lamp be more of a style moment if I can do it.

A vintage option could be fun (I didn’t have time to scroll Etsy yet), so maybe the lamp will be a flea market or estate sale find? I love the Icon Lamps from Anthropologie - all kinds of oddly cute animals as lamps. It could give a bit of a “cabinet of curiosities” feeling. I love the weird frog, and the Raccoon is cheeky. I also like the idea of a blue-and-white Chinoiserie lamp, but most of them are pretty large. Finding a cute little one might be pretty hard. This one is good, but I hate the shade. These Tiffany-style lamps are definitely a departure, but there’s something about them. It’s just such a random throwback — kind of kitch and hippie, but that’s why I think it could work. They also light up really nicely.

The one Icon Lamp I know will work is the Bumble Bee Light, which at only 9” has a lot of placement possibilities. It looks sort of vintage but bright, and I like the bee details. I also like the simple marble columns with frosted globes — the lean footprint will probably work well. Of course, this amazing (and insanely expensive) crystal lamp from Pottery Barn caught my eye, but that might be more glam than I need. I do like this Prismatic Lamp from West Elm, but even though 10”, I think it may be too big. The last two I just can’t shake. This little Jeanette beaded lamp from Anthropologie is cute and more crafted-looking than the simple round lamps above. I also love this quirky rose quartz lamp made by Friend of All via West Elm. It’s artistic, custom made, and definitely different.
Let me know which lamps look good to you below!
It’s been a few months now since the Library re-dux in my apartment and I’m kicking myself for not doing this project earlier. Obviously it had plenty of obstacles in its way, but very happy it finally came together. My friend Paul came over right after the holidays and instantly said “This is my favorite part of your whole place…” Like I said, it’s a helluva drug.
I'm also in the market for a cute table lamp and appreciate all the ones you shared! I might have to get that Anthro Jeanette Beaded Lamp for myself, just have to pick which color...
I hate to say it but I think you should get the crystal lamp. It will have longevity as a nightstand or living room lamp for your entire life! A word of warning. I've never had a lamp from anthropology that didn't break or have some cheap elements